Assets needed
- ScreamingFrog software. (You will need a license to correctly perform the analysis. )
- Agency Anayltics login
- Current client’s website URL.
What is a SEO Analysis?
A SEO Analysis is an initial step taken during website creation to gather crucial information before building begins. It involves assessing a client's existing website to identify valuable content that can be utilized in the new website. This analysis helps shape the website's structure, content strategy, and optimization techniques for improved search engine visibility and user experience.
In this SOP, you will find the step by step guide on how to perform a SEO Analysis:
1. Preparing for the SEO Audit
1.1 Install and Verify Screaming Frog License
- Ensure Installation: Confirm that the latest version of Screaming Frog SEO Spider is installed.
- Verify License: Check that the Screaming Frog license is up to date under the "Enter License" section. If necessary, obtain an updated license key from the appropriate contact (e.g., Chris Lee or Magen Toole).
1.2 Configure Screaming Frog for Optimal Crawling
- Initial Setup:
- Open Screaming Frog and navigate to "Configuration" > "Crawl Configuration."
- Customize settings to focus on critical elements by unchecking boxes for crawling images, CSS, and JavaScript unless relevant to the audit.
- Link Settings:
- Ensure both internal and external hyperlinks are selected for crawling under the "Page Links" tab. This is crucial for identifying broken links.
- Content Checks:
- Enable spelling and grammar checks in the "Content" section to catch errors that could harm the site’s credibility. Use U.S. English for these checks.
1.3 Final Setup Before Crawling
- Additional Considerations:
- Periodically review settings to ensure they match current needs. For media-rich sites, consider including videos or PDFs in the crawl.
- Saving Configuration:
- Save the configuration by selecting "File" > "Save As" and naming the settings appropriately for future use.
2. Executing the Site Crawl
2.1 Accessing the Task in HubSpot
- Locate the Client's Ticket:
- Find the ticket HubSpot. It will include the client’s name and the website URL to be audited. For example, "Cosmetic Dentistry of Hayward."
2.2 Initiating the Crawl in Screaming Frog
- Copy and Paste the URL:
- Copy the website URL from HubSpot and paste it into Screaming Frog’s URL entry field, ensuring correct subdomain usage (e.g., www or non-www).
- Start the Crawl:
- Begin the crawl by clicking "Start." Monitor the overview section to confirm that relevant content is being analyzed, excluding unnecessary elements like JavaScript, CSS, and images unless they are integral to the site.
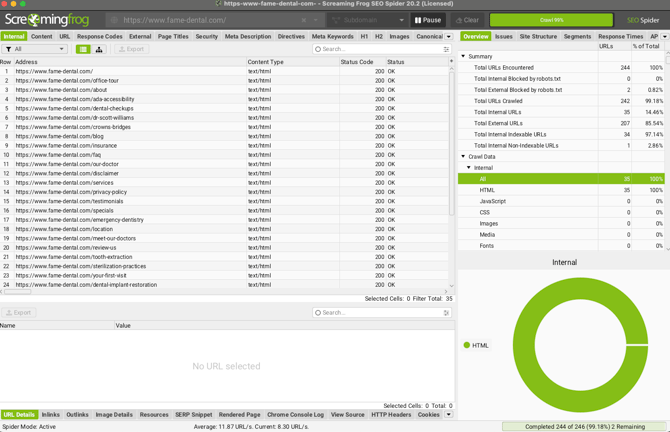
2.3 Reviewing and Exporting Crawl Data
- Analyze Crawl Results:
- After the crawl is complete, review the results in the "Internal" tab to focus on crawled URLs. Check the "Status Codes" column to identify any 404 errors or 301 redirects.
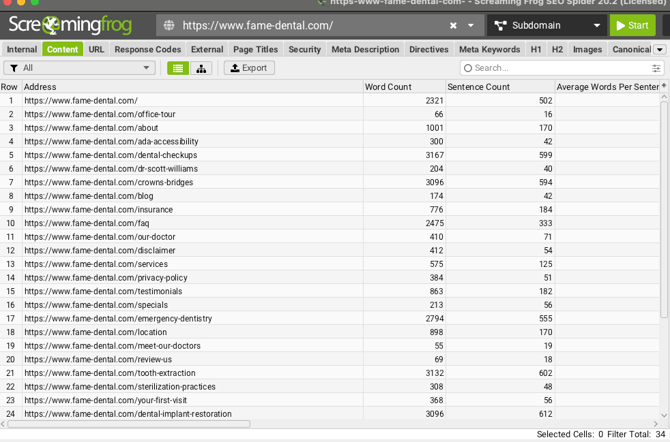
- Use the "Content" tab to review page content details, including word counts, readability scores, and the presence of spelling or grammar errors.
- Export Crawl Data:
- Export the data to a file, saving the internal URLs as internal_all.csv and content details as content_all.csv.
3. Setting Up the SEO Analysis Spreadsheet
3.1 Utilizing the SEO Analysis Template
- Access and Duplicate the Template:
- Access the standard SEO analysis template stored in a shared location, such as the “Buildouts” folder in the "Dental Marketing" section of the shared drive.
- Make a copy of the template by selecting "File" > "Make a Copy." Rename it to reflect the client and task (e.g., "Cosmetic Dentistry of Hayward SEO Analysis - New") and save it in the appropriate project folder.
3.2 Importing Data into the Spreadsheet
- Importing Internal Data:
- Open a new Google Sheets document and import the internal_all.csv file into the internal data sheet. Focus primarily on the "Address" column listing all URLs.
- Importing Content Data:
- Similarly, import the content_all.csv file into a separate sheet. Pay particular attention to the "Address" and "Word Count" columns for analyzing content quality.
3.3 Organizing and Labeling Data
- Sorting URLs:
- Sort the URLs alphabetically (A-Z) within the "Address" column. This helps identify duplicate pages, PDFs, or other files that may need special attention.
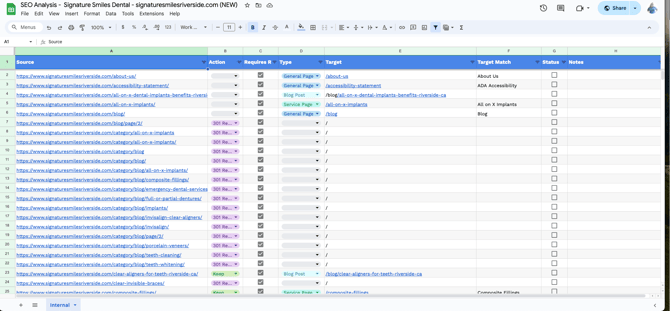
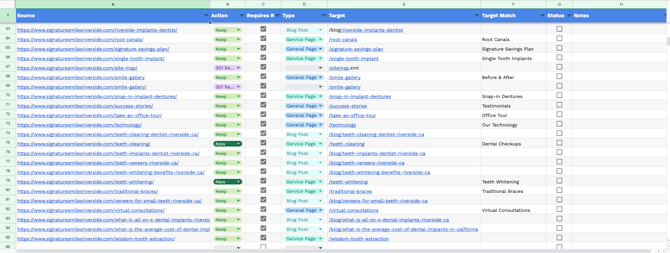
- Labeling and Categorization:
- Copy the URLs into the main SEO analysis sheet and label each URL based on the required action:
- New: Create new content for the page.
- Keep: Recreate the existing page content as it is.
- Consolidate: Merge similar pages to reduce redundancy.
- Redirect: Set up a 301 redirect to another relevant page.
- Organize URLs by Type:
- General Pages: About Us, Contact Us, Meet the Doctor, etc.
- Service Pages: Pages dedicated to specific dental services (e.g., "/services/cosmetic").
- Blog Pages: Individual blog posts.
- Copy the URLs into the main SEO analysis sheet and label each URL based on the required action:
4. Detailed Review and Content Quality Check
4.1 Organizing and Labeling in the SEO Analysis Sheet
- Transfer and Organize URLs:
- Clean up the URLs by removing the domain portion, file extensions (e.g., .php, .html), and any trailing slashes.
- Example: toothdoctor.com/about-us.html becomes /about-us
- Transfer cleaned-up URLs to the main SEO analysis sheet under 'Target.' Label each URL according to the action required (New, Keep, Consolidate, Redirect), ensuring all URLs align properly.
- Clean up the URLs by removing the domain portion, file extensions (e.g., .php, .html), and any trailing slashes.