![DentalMarketing-Logo2-White copy-1.png]](https://grow.dentalmarketing.com/hs-fs/hubfs/DentalMarketing-Logo2-White%20copy-1.png?height=40&name=DentalMarketing-Logo2-White%20copy-1.png)
Website Pre-Production turns the approved Home Page mockup into everything the site build needs: the SEO page list, the Website Deep Dive, the full content brief (including the new Services Menu tab) and the Core Pages mockup. It starts when a ticket's Creative Buildout Request Type is Website Pre Production.
What Pre-Production produces
- SEO Analysis (sites we're recreating) or Start-Up Site Map (new practices with no website): every page the new site will have, with its URL, meta title and meta description, and the 301 redirects from the old site.
- Website Deep Dive: what to keep, fix or drop from the current site, written as build instructions.
- Content brief: one Google Doc with a tab per page, plus the Website Deep Dive, Reviews, Typeforms, Widget Codes, Doctors, Staff, Specials and Services Menu tabs. It's linked in the ticket's Content Brief field.
- Core Pages mockup: Home, About, Insurance, Services and one example service page (plus Location on multi-location sites), designed in Claude Design and published on the client repository's preview link.
Before you start
- The Home Page mockup is approved.
- The ticket has the GitHub repository, BugHerd link and staging link copied from the Home Page mockup ticket.
- The company record has the Brand Story Call Document. Without it, the content brief can't be written.
- The company's service fields, offers, Typeforms and lead email are filled in HubSpot.
Step 1: Run Pre-Production
Option A: With Claude
In the Creative team's buildouts repository, run /pre-production with the ticket link. It gathers the inputs, crawls the current site, writes the SEO Analysis (or Start-Up Site Map), the Website Deep Dive and the content brief, checks the copy against our writing rules, and links the results in the ticket. Note: /pre-production only works for people with access to the Creative team's buildouts repository (creative-team-assets). Everyone else follows Option B or asks the Creative team.
Option B: By hand
Build the same pieces by hand: the SEO Analysis or Start-Up Site Map in the "SEO Analysis - 301s" folder, then the content brief with one tab per page following the Dental Content Playbook. Add the Services Menu tab described below. The video at the end of this article shows the manual content brief process.
Step 2: The Services Menu tab
Every new website has a Services mega menu in the header. Hovering over Services opens a panel with the practice's services in columns by category, the current offer with Book Now and the phone number, and a "View all services" link. On mobile it opens with a tap.
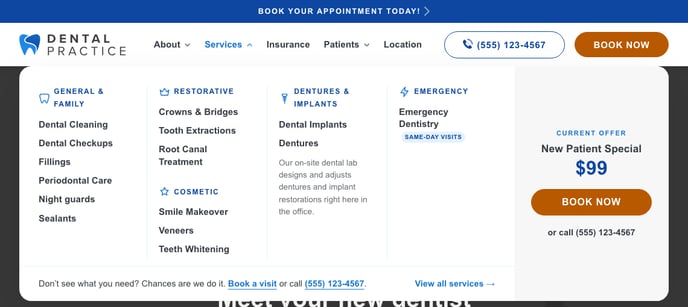
The content brief's Services Menu tab decides what the menu shows, so the designer, the content reviewer and the developer all work from the same list:
- One row per service page, with its menu column: General & Family, Restorative, Cosmetic, Dentures & Implants, Orthodontics, Kids' Dentistry, Oral Surgery or Emergency. Columns with no services don't show.
- A shorter menu label only when the page name is long.
- An optional pill (a short label such as "Same-day visits"), only when the practice confirmed it.
- An optional column note: one line under a column, only for a real differentiator the practice told us about (for example an on-site dental lab under Dentures & Implants).
- With fewer than six services, the site shows a simple Services dropdown instead of the mega menu.
The rest of the header is the same on every website: About / Services / Insurance / Patients / Location, then the phone button and Book Now. Insurance stays in the top bar because it's one of the first things patients check before booking. A client asking for a different top bar goes to the brief's Open Questions tab, and the Creative Lead decides.
Step 3: Content QA
The content reviewer reads the content brief in Google Docs before any design starts. Check:
- Every page in the SEO page list has a tab, and the copy follows the brand story and the playbook.
- Offers, prices, doctor credentials and clinical claims are ones the practice confirmed.
- The Services Menu tab lists every service page, each in the right column, and every pill and column note is something the practice confirmed.
- Open Questions are answered or sent to the Onboarding Lead/Specialist.
Step 4: Core Pages mockup
The Web Designer Lead builds the Core Pages in Claude Design with the Core Pages prompt in "Creative Buildouts SOPs + Guides" (Buildouts tab), using the content brief as the only source of copy. Every page uses the template header with the Services mega menu, restyled to match the homepage and filled from the Services Menu tab. If the approved homepage doesn't have the mega menu yet, update only its header. Check the menu on desktop (hover) and mobile (tap) before sharing the preview link.
Sites already in progress: Core Pages the client approved before November 19, 2026 keep their header as approved, and the build keeps it too. Core Pages still in client review on that date get the mega menu added before approval.
Wrap up
- The ticket has the SEO Analysis, Content Brief and preview links.
- The client's monday project items for the SEO Analysis and the sitemap are Done (Option A sets them).
- The Core Pages preview goes through Design Approval (Lead Review), then to the client for review in BugHerd, as with the Home Page mockup.
Manual content brief walkthrough (video)