![DentalMarketing-Logo2-White copy-1.png]](https://grow.dentalmarketing.com/hs-fs/hubfs/DentalMarketing-Logo2-White%20copy-1.png?height=40&name=DentalMarketing-Logo2-White%20copy-1.png)
OSM Content Documents Creation Process
-
Go to the “OSM Folder” in Google Drive:
Dental Marketing > Pods > Launches Pod > 9. Organic Social Media -
Open the “Content Document” folder:
- If you’re working on a Content Document for Canva (for the Creative Team), select the Content Documents (Canva) folder.
- If you’re working on the Content Document for Loomly, choose the Content Document (Loomly) folder.
-
Search the client's individual folder and select any existing document.
-
Duplicate the content document and rename it using the following format:
[Client Name] - OSM [Month] Content Document [Canva/Loomly]
Content Creation Process
Guidelines and Recommendations:
- The Organic Social Media package includes 12 monthly posts.
- Content is organized into 4 content pillars:
- Educational
- Promotional
- Patient Success Stories
- Specials
- Posts are categorized into 3 design layouts:
- General Post (headline, text, and CTA)
- 3 Bullet Points Post (headline and 3 bullet points)
- Reviews (Google reviews)

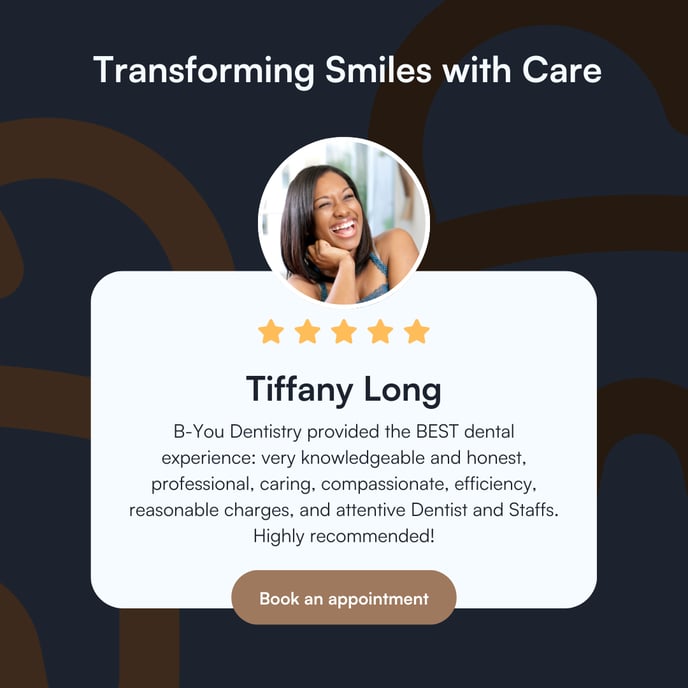

Required Information to Start:
- OB Questionnaire (Find the Folder Here): Includes key information like topics to highlight or avoid, the client’s niche (e.g., family dentistry, cosmetic), and services to promote.
- Client’s Slack channel and Canva: Check for special requests or additional comments.
- Client’s website: Gather relevant details.
- Content Prompt Sheet: Use this to guide content creation.
- Assets: Review all assets to ensure the client’s tone and message are clear before starting.
Step 1: Start the Session:
- Open ChatGPT with the Organic Content Gen GPT selected.
- Click on "I'd like to create a new content calendar." Option
- ChatGPT will ask for :
- The SMQ file (PDF or text)
- The website URL(s)
Step 2: Fill in Any Missing Info
When prompted, provide any missing details. You must confirm:
-
Practice name
-
Practice style (e.g., family, cosmetic, pediatric)
-
Target month and year (e.g., November 2025)
-
Number of patient reviews to include (0–4)
-
Whether the calendar will include:
-
Behind-the-scenes photos
-
Team photos
-
Giveaways
(usually all “no” unless approved by client)
-
🔔 The AI will pause until you confirm all info is ready.
Step 3: Generate the Calendar Outline:
Once you confirm all the information, the tool will return 12 post ideas. Each is tagged as: Educational, informative, testimonial.
- Check that important days are added if applicable(e.g., Thanksgiving, St. Valentine's Day, Christmas, etc.)
- Review for accuracy and tone.
- If the outline needs any correction, mention the detailed updates you need.
-
✅ If it looks good, type:
“Approved — develop week 1.”
Step 4: Approve Each Week of Posts:
For each week (3 posts), the AI will return:
-
Layout (General / 3 Bullet / Review)
-
Headline
-
Image text
-
Caption 1 (with CTA and emojis)
-
Caption 2 (a different version)
Note: All captions should contain Hashtags.
➡️ After reviewing each week, type:
“Approved — continue.” if the content is approved (If content needs any update or arrangement provide the deiled instruction to ChatGPT before approving)
Repeat until all 4 weeks (12 posts) are complete.
Step 5: Duplicate Content & Final Calendar
After all posts are approved:
-
The AI will ask if you want to check for content duplicates. (Usually, the platform fails during this check, so consider skipping this option)
-
The AI will ask if you want a copy-paste-ready version organized by week. (Choose this option) This final version will be needed for our Loomly Document.
Step 6: Organize by Layout
For our Canva Content, we will need another version:
-
Type:
“Organize by layout.”
The AI will group posts by type (e.g., all reviews together) with CTA included. This will be the format needed for the Design Team.
Step 7: Organizing Google Documents:
-
Two Google Documents are needed:
- One for the Creative Team to work on graphics.
- One for Loomly with full posts and captions for scheduling.
-
Content Document for Loomly:
- Copy the copy-paste-ready version with the approved content and paste it into a new Google Doc.
- Follow this naming format:
[Practice Name] - Organic Social Media [Month] Document (Loomly)
-
Content Document for Canva:
- Copy the Organized by Layout version.
- Check for errors in post placement and ensure only the headline, content, and CTA are included.
- Paste the posts into a new Google Doc and name it using this format:
[Practice Name] - Organic Social Media [Month] Document (Canva) - Ensure only approved posts are included.
Updating the HubSpot Ticket:
- Once both documents are ready, upload the Canva document link to HubSpot:
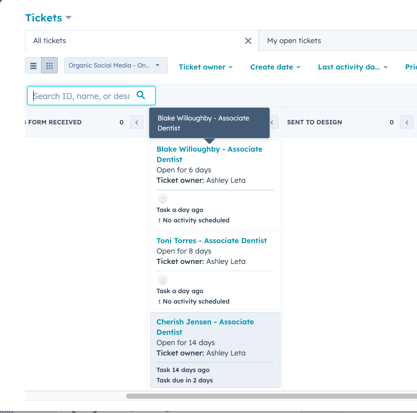
- Go to the Organic Social Media Pipeline (Onboarding or Active).
- Find the correct ticket
.
- In the “Organic Social Media Assets” section, under “Organic Social Content,” paste the document link for Canva and click “Save.”
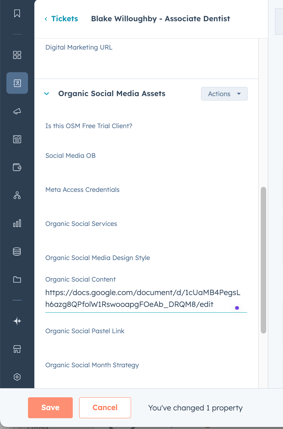
- This will advance the ticket to the next phase for the Graphic Designer.